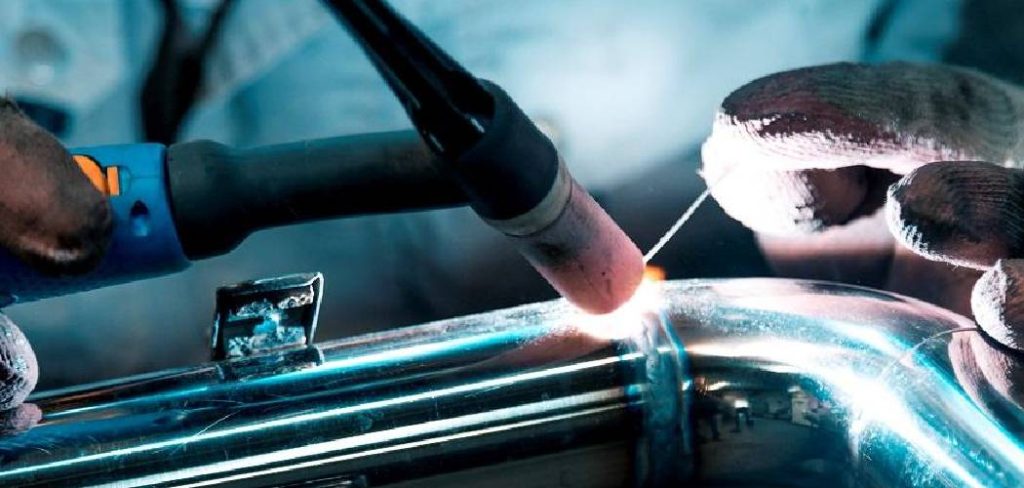
TIG welding stainless steel gives you some of the cleanest, strongest, and most attractive welds you can make. It also takes patience and a steady hand. If you have ever admired those smooth, evenly spaced weld beads on a stainless handrail or kitchen counter, chances are good that a TIG torch made them.
This guide on how to weld tig stainless steel walks you through everything you need to start TIG welding stainless steel with confidence. You will learn why this method works so well, what gear to gather, and a clear ten-step process to follow.
We will also cover common mistakes that trip up new welders, plus the most frequently asked questions. By the end, you will have a solid foundation to practice and improve.
What Are the Benefits?
TIG welding, short for Tungsten Inert Gas welding, stands out for a reason. When you work with stainless steel, it offers real advantages over other methods.
First, you get precision. The TIG process lets you control the heat and the filler metal separately. That means you can make fine, accurate welds on thin material without burning through. This is perfect for stainless, which is sensitive to heat.
Second, the welds look great. TIG produces clean beads with very little spatter. You spend less time grinding and polishing afterward. For projects where appearance matters, like food-grade equipment or visible structures, this is a big win.
Third, TIG welds are strong and corrosion-resistant. When done right, the joint keeps the stainless steel’s natural ability to resist rust. This matters in kitchens, hospitals, and outdoor settings.
Finally, TIG works on thin and thick stock alike. You can weld delicate tubing or heavier plate by adjusting your settings. That versatility makes it a skill worth learning.
What Will You Need?
Before you strike an arc, gather the right tools and materials. Having everything ready saves time and keeps you safe.
- TIG welder with high-frequency start and AC/DC capability (use DC for stainless)
- Tungsten electrodes (2% thoriated or lanthanated work well for stainless)
- Shielding gas — pure argon is the standard choice
- Filler rod matched to your stainless grade, such as ER308L for 304 stainless
- Foot pedal or torch control to adjust amperage on the fly
- Auto-darkening welding helmet with the right shade
- Welding gloves made for TIG (thin and flexible for control)
- Flame-resistant jacket and clothing
- Stainless steel wire brush (never use one shared with carbon steel)
- Acetone or stainless cleaner for prepping the metal
- Grinder or file for edge preparation
- Clamps to hold your workpiece steady
- Well-ventilated workspace or a fume extractor
Stainless steel fumes can be harmful, so good ventilation is not optional. Make sure your area is clear of flammable items too.
10 Easy Steps on How to Weld TIG Stainless Steel
Step 1: Set Up a Safe Workspace
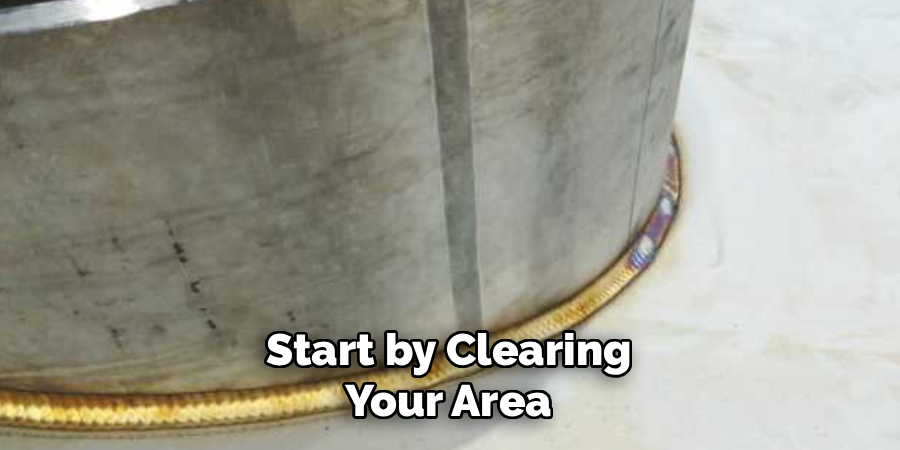
Start by clearing your area of anything that could catch fire. Stainless welding produces sparks, heat, and fumes. Set up in a space with strong airflow or use a fume extractor right at the weld. Put on your jacket, gloves, and helmet before you begin. Check that your cables are in good shape and your ground clamp connects firmly to clean metal. A safe setup protects you and helps you focus on the weld instead of worrying about hazards.
Step 2: Choose the Right Tungsten and Prepare It
For stainless steel on DC, reach for a 2% lanthanated or thoriated tungsten. A 1/16-inch diameter handles most thin to medium work. Grind the tip to a sharp point, with the grind marks running lengthwise along the electrode, not across it. A pointed tip gives you a tight, focused arc that you can direct precisely. Keep a separate grinding wheel just for tungsten to avoid contamination. Re-sharpen the tip whenever it gets dirty or rounded.
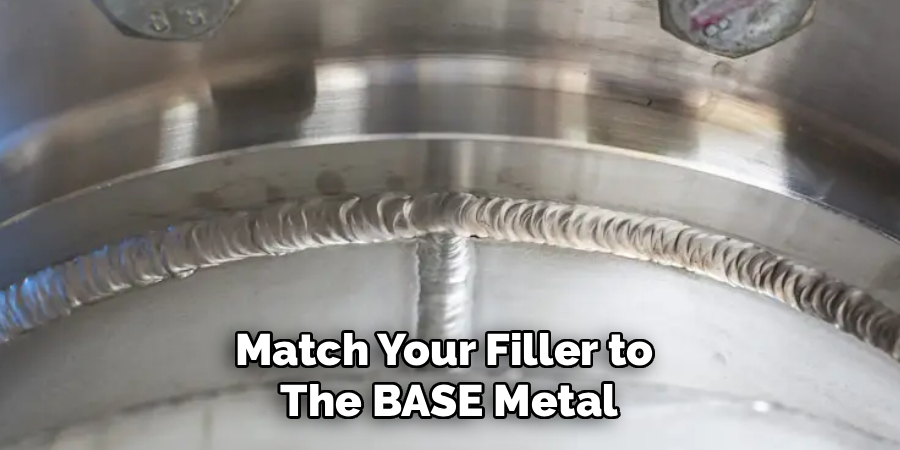
Step 3: Select Your Filler Rod
Match your filler to the base metal. For common 304 stainless, use ER308L filler. For 316 stainless, choose ER316L. The “L” means low carbon, which helps the weld resist corrosion. Using the wrong filler can weaken the joint or cause rust later. Wipe the rod clean before use, since oils and dirt cause weld defects. Keep your filler stored somewhere dry and clean so it stays ready to use.
Step 4: Set Up Your Shielding Gas
Pure argon is your go-to gas for TIG welding stainless steel. Set your flow rate between 15 and 20 cubic feet per hour for most jobs. Too little gas leaves the weld unprotected, causing oxidation and discoloration. Too much wastes gas and can pull in air, creating turbulence. Check your hoses and connections for leaks. For full-penetration welds on tubing, you may also need back-purging with argon to protect the underside of the weld.
Step 5: Dial In Your Machine Settings
Set your welder to DC electrode negative for stainless. A good starting rule is about 1 amp per 0.001 inch of material thickness. So a piece that is 1/8 inch thick (0.125″) needs roughly 125 amps. Use the foot pedal to fine-tune as you go. Start a little lower than you think you need, since stainless holds heat. You can always add power, but too much heat warps and discolors the metal fast.
Step 6: Clean the Metal Thoroughly
Stainless steel must be spotless before welding. Wipe the joint with acetone to remove oil and grease. Then use a stainless-only wire brush to remove any oxide layer. Never use a brush that has touched carbon steel, because it transfers iron particles that cause rust. Clean both the base metal and your filler rod. This step matters more than many beginners realize. Clean metal gives you bright, strong welds, while dirty metal leads to porosity and weak joints.
Step 7: Position and Clamp Your Workpiece
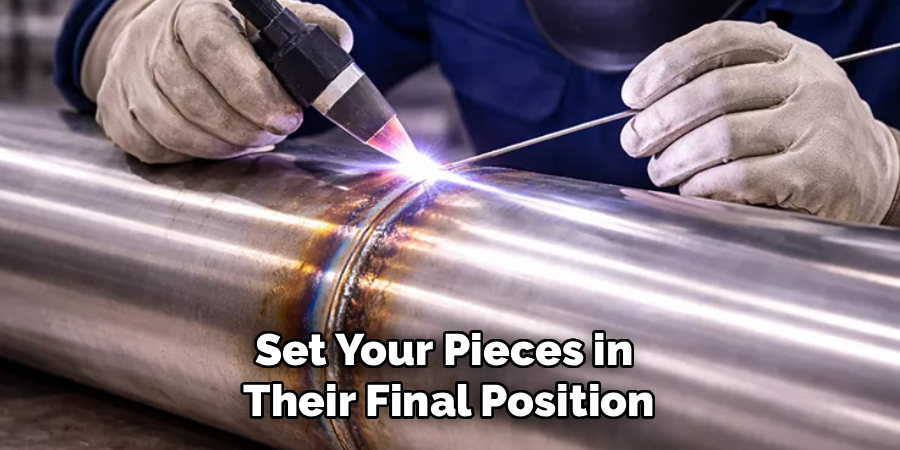
Set your pieces in their final position and clamp them tightly. Stainless steel expands and warps with heat, so good clamping keeps everything aligned. Fit the joint closely with little to no gap for the best results. If you are welding a long seam, tack weld it in a few spots first. Place tacks every few inches to lock the parts together. This prevents the metal from pulling apart or twisting as you weld.
Step 8: Strike the Arc and Form Your Puddle
Hold the torch at about a 15 to 20 degree angle from vertical. Keep the tungsten close to the metal, around 1/8 inch away, without touching it. Use the foot pedal to start the arc smoothly. Watch for a small, shiny puddle to form. This molten pool is what fuses your metal together. Do not add filler yet. Let the puddle develop fully so you know the metal is ready to accept the filler rod.
Step 9: Add Filler and Control Your Heat
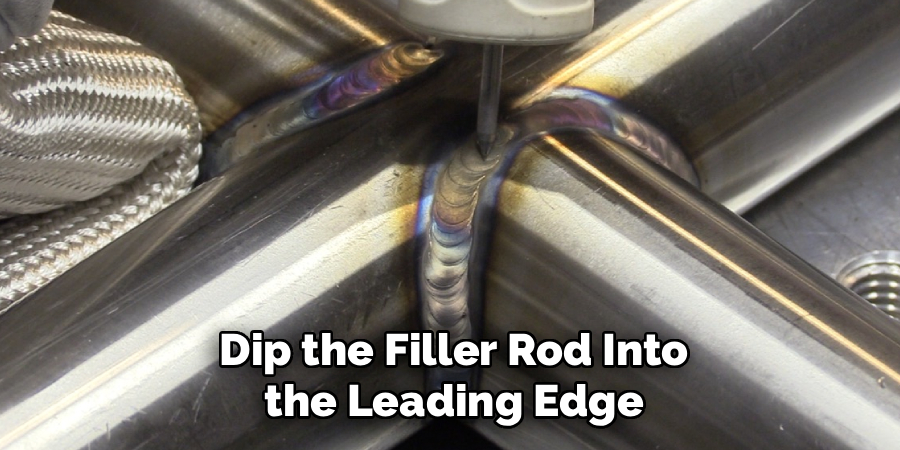
Once your puddle forms, dip the filler rod into the leading edge of the pool with a quick, steady motion. Pull it back, move the torch forward slightly, then dip again. This rhythm creates the classic stacked-dime bead. Keep the filler under the gas shield so it does not oxidize. Watch the color of the metal behind your weld. Straw or light gold is fine, but blue, gray, or black means you are running too hot. Ease off the pedal to cool things down.
Step 10: Finish, Cool, and Inspect
When you reach the end of your weld, taper off the heat slowly with the foot pedal. Keep the torch over the weld for a few seconds after the arc stops so the shielding gas protects the hot metal as it cools. Let the piece cool naturally instead of quenching it. Once cool, inspect your weld for even beads, good penetration, and clean color. A light cleaning with a stainless brush will brighten the finished joint.
5 Things You Should Avoid
- Too much heat. Stainless holds heat and warps easily. Running too hot causes burn-through, discoloration, and weak welds. Keep your amperage in check.
- Contaminated tools. Using a wire brush or grinding wheel that touched carbon steel will spread iron particles. These cause rust spots that ruin your stainless work.
- Skipping the cleaning step. Oil, grease, and oxide all lead to porosity and poor fusion. Always clean both the metal and filler before welding.
- Wrong filler or gas. Mismatched filler weakens the joint, and the wrong gas mix leads to oxidation. Stick with pure argon and a matched filler rod.
- Touching the tungsten to the puddle. This contaminates the tungsten and the weld. If it happens, stop and re-grind the tip before continuing.
Conclusion
TIG welding stainless steel rewards patience and good preparation. The method gives you clean, strong, corrosion-resistant welds that look as good as they perform. The secret lies in the details: clean metal, the right filler and gas, controlled heat, and steady technique.
Start with the basics covered here. Set up a safe space, prep your tungsten and filler, dial in your settings, and clean everything well. Then practice the rhythm of forming a puddle and adding filler. Pay close attention to heat and color, since stainless punishes overheating quickly.
Hopefully, the article on how to weld tig stainless steel has given you a good foundation. However, there is always more to learn and improve upon in the world of welding.
About
Stuart Rich is a distinguished figure in the world of metalworking and fabrication, with a decade of expertise creating innovative and sustainable metal projects. His professional focus lies in merging traditional blacksmithing and machining with modern manufacturing techniques, fostering designs that are both practical and durable. As the author of Metalenify, Stuart Rich delves into the art and science of metallurgy and DIY metal creation, inspiring artisans, hobbyists, and industry professionals alike.
Education
RMIT University
(Melbourne, Australia)
Associate Degree in Engineering Technology (Mechanical / Manufacturing)
Focus on metallurgical properties, industry-driven projects, and practical metal craftsmanship. Gained hands-on experience with traditional machining and digital manufacturing tools, such as CAD, CNC software, and precision welding equipment.
Nottingham Trent University
(United Kingdom)
Bachelor’s in Product Design and Materials Engineering (Honors)
Specialized in product design with a heavy focus on blending creativity with metal production and fabrication techniques. Participated in real-world industry projects, collaborating with architectural and hardware manufacturing companies to optimize material efficiency.
Publications and Impact
In Metalenify, Stuart Rich shares his insights on structural metal design processes, material grades, and strategies for efficient shop production. His writing bridges the gap between raw artisan knowledge and modern industrial needs, making it a must-read for both budding DIY metalworkers and seasoned fabrication professionals.


